This guide is a work in progress. If you have questions or problems ask for help in the Momentum Mod Discord. #
Before you start, you should know that maps with simple geometry work best for porting. Complex geometry can cause invalid solids which will need to be manually remade, and some textures will need to be realigned.
Prerequisites:
- Have a basic understanding of Goldsrc, Valve Hammer Editor, and potentially Trenchbroom
Download the .BSP and (in some cases) the .WAD #
Most Team Fortress Classic skill maps can be found on the TFC Refugees forum here: https://www.tfcrefugees.com/resources/categories/conc.4/
Maps downloaded from this forum always include any relevant custom content not packed into the map itself. Additionally many maps have descriptions and author info text documents included.
Of the files downloaded, the BSP is the actual map file, and the WAD contains the textures used in the map. In most cases custom textures will be embedded into the BSP itself.
Obtaining the .map file #
You will need the .map or .rmf file for the map you wish to port to Source. It will make your life much easier if you can get the original from the creator, however it is not required.
What decompiler to use? #
There are five decompilers available for GoldSrc maps. They are listed from best to worst as follows:
- Half Life Unified SDK Map Decompiler (HUSK MD)
- Modified BSP Converter (MBSPC)
- Windows BSP Converter (WinBSPC)
- BSP Viewer (BSPV)
- BSP2MAP
Goldsrc does not store original brush geometry in its BSPs like Source does. As a result decompiles will not be “clean” in the sense that there will be very odd looking geometry generated compared to a decompile of a Source map.
The two methods of decompilation can be described as “Tree-Based” and “Face-To-Brush”. Tree-Based decompiles or the “cube” generate map files that appear as if the map geometry is carved out of the center of a cube. While not easy to work with when trying to modify a decompiled map, this method is the better of the two. This is primarily due to how this method prevents leaks.
Face-To-Brush decompilation converts every single brush face into its own separate 1 unit thick brush. This method is the worse of the two mainly due to all the texture z-fighting that arises on convex corners. This method typically results in a map file which exceeds Hammer’s brush limit. In most cases’especially for porting movemment maps like conc’a Tree-Based decompile is better to work with.
More information on this is available on the release page of HUSK MD.
Half Life Unified SDK Map Decompiler (HUSK MD) #
Download available here: https://github.com/SamVanheer/HalfLife.UnifiedSdk.MapDecompiler
This is by far the best decompiler to use. It cannot be reiterated enough that any attempts at porting GoldSrc content should start with this decompiler. The vast majority of information on GoldSrc map decompiling and porting is outdated. Old guides will typically point to WinBSPC or BSP2MAP, but these tools are practically obsolete at this point.
This decompiler has the following advantages over the other options:
- Offers both Tree-Based and Face-To-Brush decompiles
- In active development
- Modern GUI
- Rarely if ever crashes when attempting to decompile
- Customizable decompile options
- Can automatically extract embedded textures
Modified BSP Converter (MBSPC) #
Download available here: https://gamebanana.com/tools/6565
While not as good as HUSK MD, MBSPC is responsible for a large portion of the ports currently playable in Momentum Mod. Decompiles with this tool give similar results to those of HUSK MD.
The pros and cons of this decompiler are as follows:
- Exclusively Tree-Based decompiles
- Last updated in 2012
- No GUI, command line only
- Rarely if ever crashes when attempting to decompile
- Customizable decompile options
- Does not automatically extract embedded textures
Windows BSP Convert (WinBSPC) #
Download available here: https://gamebanana.com/tools/download/5030
The original Tree-Based decompiler for GoldSrc. Functionally obsolete with the existence of MBSPC and HUSK MD.
The pros and cons of this decompiler are as follows:
- Exclusively Tree-Based decompiles
- Has not been updated since the early 2000s
- Has a GUI
- Prone to crashing and failing to decompile all types of maps
- Customizable decompile options
- Does not automatically extract embedded textures
BSP Viewer (BSPV) #
Download available here: https://nemstools.github.io/pages/BSP_Viewer-Download.html
The precursor to Crafty, both these programs are stand alone tools that are capable of loading and viewing BSPs without having any game open. BSPV is capable of Face-To-Brush decompiles, but this feature was removed in Crafty.
The pros and cons of this decompiler are as follows:
- Exclusively Face-To-Brush decompiles
- Has not been updated since the early 2000s
- Has a GUI
- Rarely if ever crashes when attempting to decompile
- Decompiles are almost always thousands of brushes over Hammer’s limit
- Prone to generating spaghetti
- Limited decompile customization options
- Does not automatically extract embedded textures
BSP2MAP #
Download available here: https://www.moddb.com/games/half-life/downloads/bsp2map1
The original GoldSrc decompiler. This tool really should never be used at this point as BSPV and HUSK MD provide better results for Face-To-Brush decompilation.
The pros and cons of this decompiler are as follows:
- Exclusively Face-To-Brush decompiles
- Has not been updated since the early 2000s
- Command line only, no GUI
- Does not typically crash when decompiling
- Prone to generating spaghetti
- Limited decompile customization options
- Can extract embedded textures
Decompiling with WinBSPC #
Open WinBSPC, in the top left corner select file > convert. Navigate to the BSP file you wish to decompile and select it. Select the “MAP” option under “Convert to” and make sure “best match texturing” is not selected under “MAP options”. Choose the desired output folder and click OK.
Decompiling with BSPTwoMap #
BSPTwoMap, is a command-line application, simply drag the bsp onto to .exe to decompile it.
Converting the textures #
Assuming you are using HUSK MD, after decompiling a .wad file with all the relevant textures will be generated. This .wad file will need to be converted into .vtf and .vmt files so that the textures are usable in source. The easiest way to convert these textures is with VTFEdit.
Download VTFEdit here: https://github.com/NeilJed/VTFLib
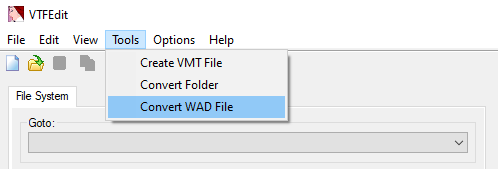
With VTFEdit installed, navigate to Tools -> Convert WAD File. Select a .wad to be converted and a relevant folder for the output. Make sure “Create VMT Files” is checked as creating them manually can get quite tedious. The .vmt files generated will not preserve any of the properties of the original textures in the WAD. In other words a glass texture will not be transparent without designating it as such manually in the .vmt file.

Occasionally VTFEdit will stall on certain textures in a WAD preventing the conversion from finishing. If this happens the WAD must be edited to remove the offending texture. This can be done with SLADE.
Download SLADE here: https://slade.mancubus.net/index.php?page=downloads
Open the troublesome .wad file in SLADE. Read the output log of VTFEdit where it will name the problematic texture. Simply select and delete this texture in SLADE, and then save the .wad file. Repeat this process if VTFEdit stalls during the conversion again.
If you do not want to download VTFEdit, this can be done through a program called xwad. Xwad is a command line application, you can get it by downloading the Source SDK on steam, (NOT 2007 or 2013) and navigating the bin folder where the developer tools are stored. You’ll need to create a .bat and add the parameters -BaseDir (location of the momentum folder) -WadFile (location of the .wad) and -vtex (automatically calls vtex to convert the created TGA files into VTF files). The .bat would look a little something like this:
xwad -BaseDir [PATH TO MOMENTUM FOLDER] -WadFile [PATH TO .WAD] -vtex
The resulting folders should be placed in the materials folder of the game you are mapping for. Any still missing textures would be from Half-Life, TFC, or Counter-Strike, do the same process for those WADs.
If using BSPTwoMap #
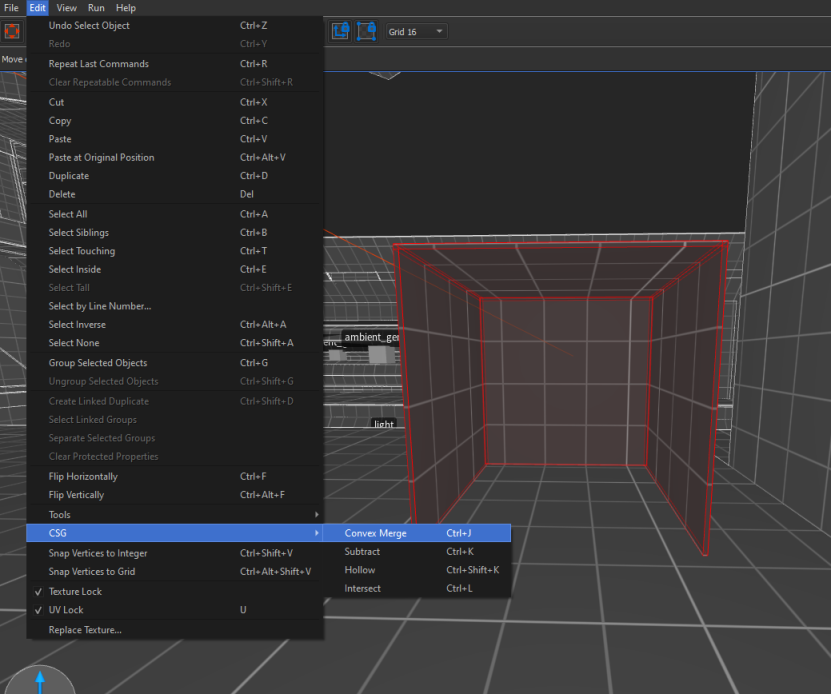
Download Trenchbroom set it up for Half-Life(experimental). Open the map with J.A.C.K (see below) remove and then fix the invalid brushes. You will need to do it in J.A.C.K and not Hammer. Then, open the .map and go around combining mutiple brushes that would be one single brush by control-clicking them all, and press control+j (convex merge). This will take a long time if it’s a large and complex map.

Converting .map to .vmf #
Download J.A.C.K and install it. You do not need to fill out the install locations of games that J.A.C.K. can use during the install process if you do not own any of the games, it will still be able to convert the files without it.
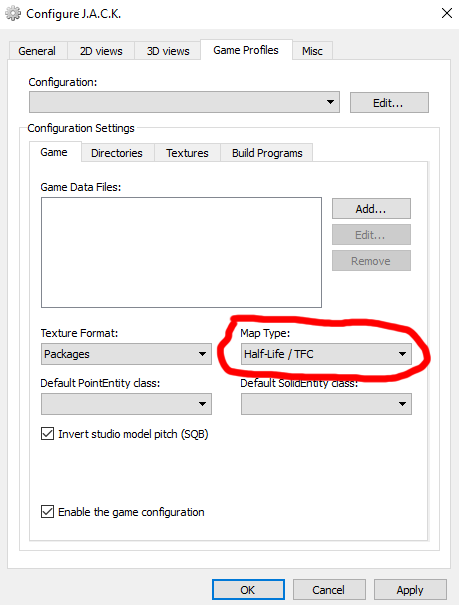
Once it is installed, open J.A.C.K. and click Tools > Options, or press F2 to bring up the settings. In the Game Profiles tab, make sure that the map type is set to Half-Life / TFC before trying to open the .map file, otherwise the map may fail to load.

Now click File > Open, and open the .map file you are converting. Once it has loaded, there will likely be invalid solids that stretch to infinity. Delete these now, you’ll need to remake them later. Click File > Save As… and save as a “Half-Life VMF”.
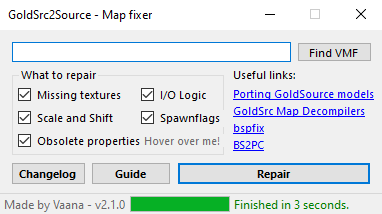
Before you open this VMF in Hammer however, there’s one more thing we should do. Download a tool called GoldSrc2Source. Click Find VMF and navigate the VMF file you just saved in J.A.C.K. Select it and click repair, it’s best to have all parameters marked in GoldSrc2Source in the vast majority of cases.

Finally, load Hammer and open the VMF! There will likely be a few missing textures through the map, but these will be tool textures. Find them and replace them to their Source equivalent.
Converting entities #
Now you can start converting the entities to their Source equivalents. The trigger_multiple entities that are used for controlling the timer should be converted to the momentum mod zone system;
Push trigger values probably need to be adjusted, or they should be replaced with a trigger_catapult and an info_target, or by a trigger_setspeed depending on how the trigger is supposed to function.
Final polish #
Now it’s time to put the final polish on the map. Fix up any broken geometry (although there might not be any if the map is simple enough), fix the lighting issues if there are any, and align any textures that may have become misaligned. You also might have to func_detail some of the brushes if there are a lot of small details, in order to cut down compile times.
You can now compile the map!