Before you start, you should know that maps with simple geometry work best for porting. Complex geometry can cause invalid solids as vertices tend to shift around if they are off grid, and you will be forced to recreate a lot of the brushes manually. Patches and props cannot be ported across either, so choose maps without those or you will have to spend a lot of time manually replacing them in Hammer.
Momentum Mod also does not have working slick or any weapons yet, so maps using those will not work for now.
Prerequisites:
- Have a basic understanding of GtkRadiant and Valve Hammer Editor
Download the .pk3 for the map #
You can download maps from https://ws.q3df.org/maps/ in pk3 format which will contain the .bsp and all relevant custom textures needed for the map, or download the maps through the quake3 defrag client.
Obtaining the .map file #
You will need the .map file for the map you wish to port to Source. I would recommend getting this from the original map maker if they still have it, or you can decompile the .bsp using the Q3Map2.exe included with GtkRadiant (this is less accurate than the original file).
Decompiling with Q3Map2 #
First, extract the .bsp of the map you want to decompile from the pk3, and place it in the same location as the Q3Map2.exe - This should be within the GtkRadiant folder by default.
Next, create a .bat file in the same folder as the Q3Map2.exe containing the following;
'[PATH TO q3map2.exe]" -game q3a -convert -format map [NAME OF THE BSP].bsp
Running the .bat file should output the decompiled .map file into the same folder.
Preparing the level for Hammer #
Once you have the .map file, open it in Radiant and check that the geometry of the map isn’t too large. It has to be able to fit into the Valve Hammer Editor grid, which has a maximum size of 32768^3 units. Also make sure the map geometry is as centered as you can get it on the x y z axes.
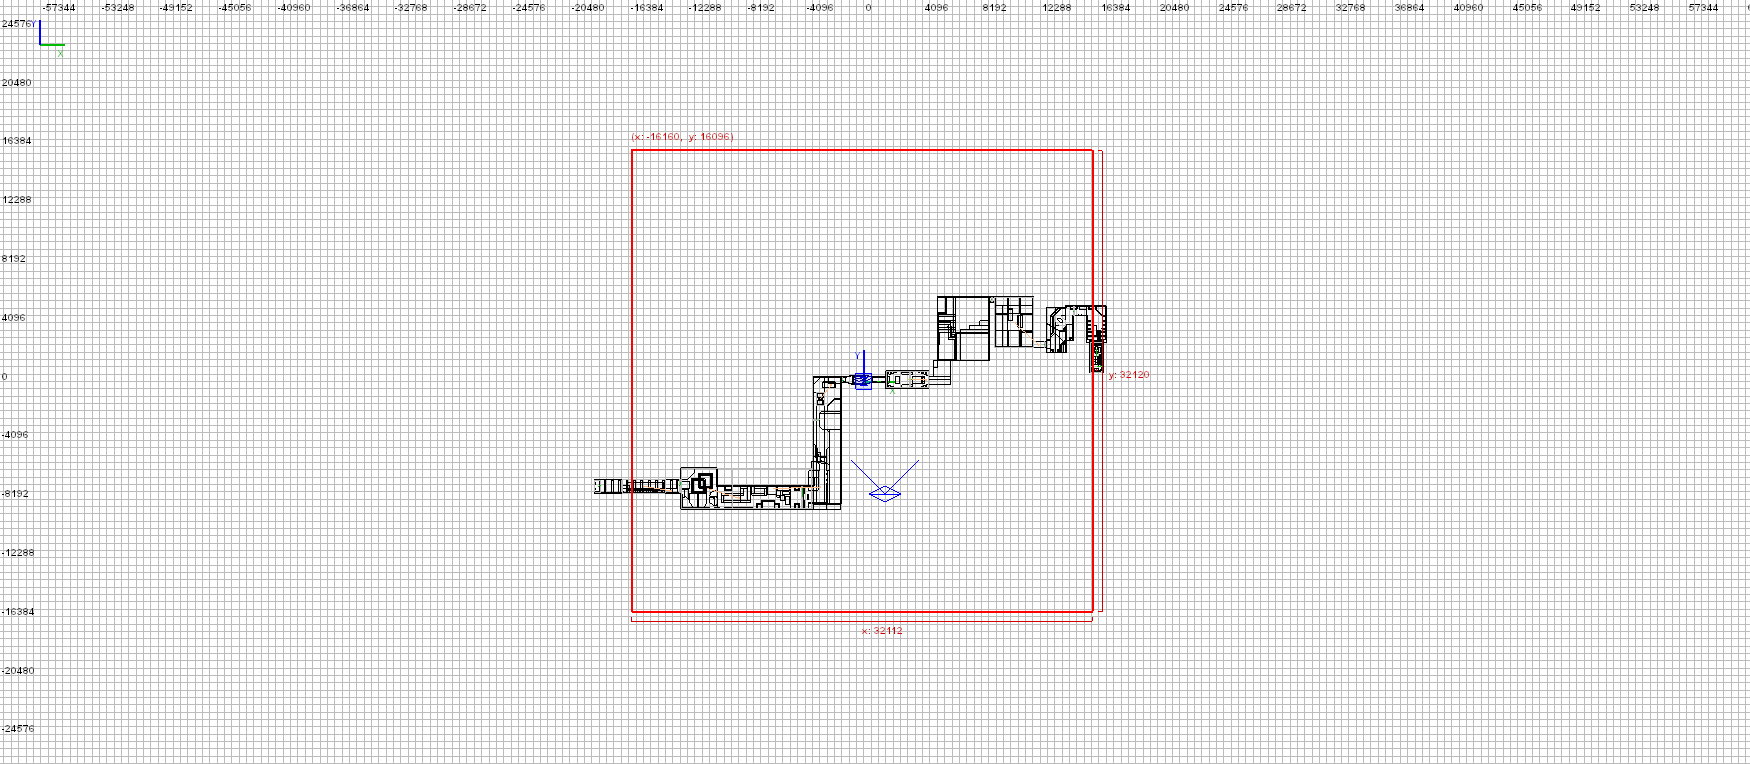
If the map is too large - like in this example - you will need to split it into smaller segments, and stitch them together with seamless world portals afterwards in Hammer.

Next, delete all patches and models if there are any as these will not work in Hammer. You can use the filters in Radiant under View > Filter to find them.
You should now be able to save the changes.
Converting .map to .vmf #
Download https://jack.hlfx.ru/en/download.html and install it. You do not need to fill out the install locations of games that J.A.C.K. can use during the install process if you do not own any of the games, it will still be able to convert the files without it.
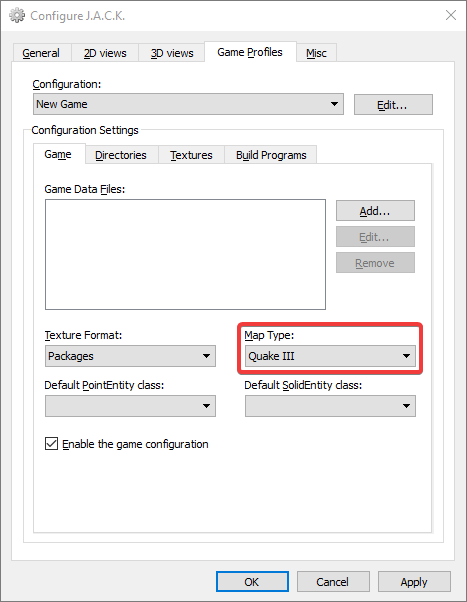
Once it is installed, open J.A.C.K. and click Tools > Options, or press F2 to bring up the settings. In the Game Profiles tab, make sure that the map type is set to Quake III before trying to open the .map file, otherwise the map may fail to load.
Now click File > Open, and open the .map file you are converting. Once it has loaded, change the map type again to Half-Life/TFC and click File > Save As, and make sure the file type is set to Half-Life VMF. You should now have a VMF version that works in Hammer.
Load Hammer and open the VMF. You may get an invalid solids warning the first time you load the map, this will tell you how many brushes have been broken during conversion. Hopefully this number is in the single digits.
If the map doesn’t fit within the grid bounds, you have done one of the steps incorrectly in the ‘Preparing the level for Hammer’ section and will have to go back and repeat the whole process from there.
If the geometry fits into the grid, you can close Hammer for now.
Converting textures #
Now you need to convert the textures to work in source. If the map uses custom textures, they will be included in the pk3 of the map. If the map uses Quake 3 textures, you will need to find them in Quake 3’s pak0.pk3 file, or replace them with different textures (with the map creators permission).
Open the pk3 file and find the textures folder. Inside the textures folder will be some more sub folders. Copy all of these sub folders into the Materials folder of the game you are using Hammer for. It is important that you keep the folder structures the same when converting, or Hammer will not be able to identify where the textures are.
Now you need a program to convert image files to VTFs, for this tutorial we will be using VMT-Editor but VTFEdit also works.
Open VMT-Editor and click Tools > Convert to VTF. Click Add and find the first sub folder that you have copied over into the materials folder. Select all of the image files in the sub folder and click Open. Then next to Output click browse, and select the same sub folder. Press the convert button to convert these images to VTFs. Once those are done converting, press Clear List, and do the same again for the remaining sub folders. Make sure you change the output folder for each batch of textures that you convert.
Once all of the textures are converted, now you need to create the VMTs. Click Tools > Batch VMT and select all of the VTFs you have just created. You do not have to do this one folder at a time, you can select all of them. Once all of the textures are selected, press Batch.
And you’re done! Reopen Hammer and load up the map. You should see working textures in the 3D view.
There will most likely still be some missing textures, but these will be tool textures that Source has an equivalent version of that you should replace them with. For a full list of Source tool textures and their uses read here: https://developer.valvesoftware.com/wiki/Tool_textures
Converting entities #
Now you can start converting the entities to their source equivalents. The trigger_multiple entities used for the timer in defrag should be converted to the momentum mod zone system;
The targets used for the trigger_teleport end points should be converted to info_teleport_destination.
Kill triggers should be replaced with trigger_teleports back to the start.
Launch pads should be replaced with a trigger_catapult and an info_target, or by a trigger_setspeed depending on how the launcher is supposed to function.
Final polish #
Now it’s time to put the final polish on the map. Fix up any broken geometry (although there might not be any if the map is simple enough), add some lighting and align any textures that may have become misaligned. You also might have to func_detail some of the brushes if there are a lot of small details, in order to cut down compile times.
You can now compile the map!