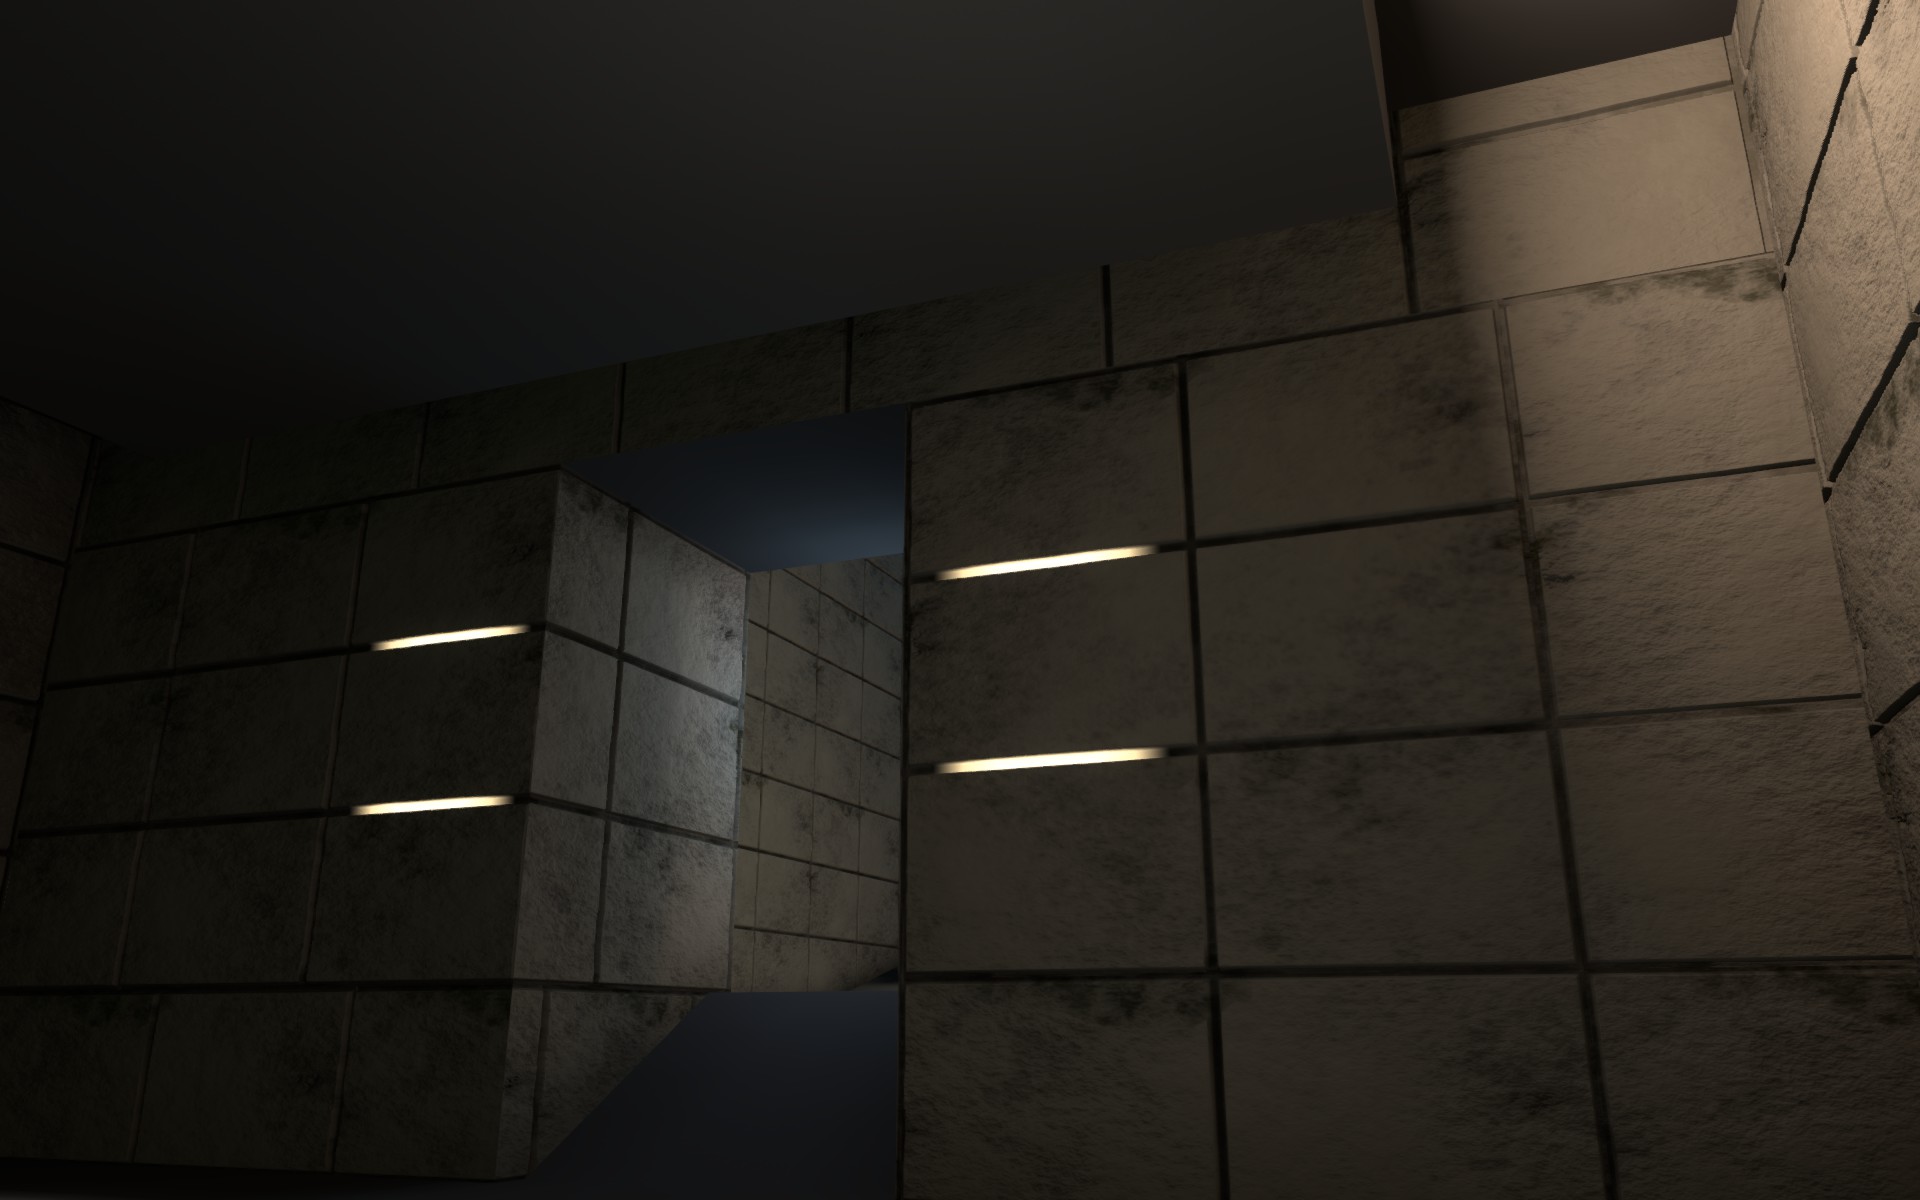
The Physically Based Rendering (PBR) shader is a powerful new tool for Strata Source that provides more realistic and versatile rendering of brushes, displacements and models whilst using fewer textures and needing fewer VMT tweaks.
The original repo can be found on GitHub.
This guide will be a general overview of its use and how to set up textures for it from scratch.
Prerequisites #
To make proper use of this Guide you should:
-
Know and understand the PBR Metal/Rough workflow.
-
Have access to any material authoring suite, like Substance Painter / Designer or the excellent Material Maker, and have some experience with them for making PBR textures from scratch.
-
Any image manipulation program if you’re not using a material authoring suite and already have PBR textures that you need to create an MRAO from.
-
You’ll need, at the very least:
Color Maps MRAO Maps Normal Maps Emission Maps 
An albedo/color map with optional transparency in the texture’s alpha channel. This means that no lighting information, such as baked AO, should exist in the texture. Recommended suffix: _color or _C. Since we use a metal/rough setup (as opposed to a spec/gloss workflow), we pack the Metal, Roughness and Ambient Occlusion grayscale maps into one, called the MRAO map. Recommended suffix: _MRAO. A normal map and, if Parallax Occlusion is desired with the material, a height map defined in the alpha channel. Recommended suffix: _normal or _N. If needed, an emission texture (note that it’s not a mask). Recommended suffix: _emission or _E. -
Finally, an environmental map. THIS IS REQUIRED! Preferably just using
env_cubemap(don’t forget to build cubemaps for your map!).
VMT Example #
Here is an example VMT:
PBR
{
    $baseTexture        concrete/concrete01_C
    $MRAOTexture        concrete/concrete01_MRAO
    $emissionTexture    concrete/concrete01_E
    $bumpMap            concrete/concrete01_N

    $parallax           1
    $parallaxCenter     0
    $parallaxDepth      .05

    $envMap             env_cubemap

    %keywords           concrete,PBR,brutalist
}
If using PBR for a model, $model 1 must be added for it to work!
As you can see, defining a PBR material is much simpler than defining and tuning a VLG or LMG shader. PBR is, however, restrictive for NPR (non-photorealistic rendering), if you are envisioning more painterly or cartoonish visuals, it’s best to use the classic shaders.
Parallax Occlusion has its limitations and things to be wary of. The parallax effect has a limited number of layers by default, but you can increase it with
$parallaxScale <multiplier>. Note that increasing this number will degrade performance for some players!.Another thing you might notice is that the depth effect continues past the edge of the face it’s applied to, depending on the effect you’re after, the solution is a balancing act between the authored height map,
$parallaxCenter, and$parallaxDepth. See the Strata Wiki for help with all the available parameters.
Texture Creation - Material Maker #
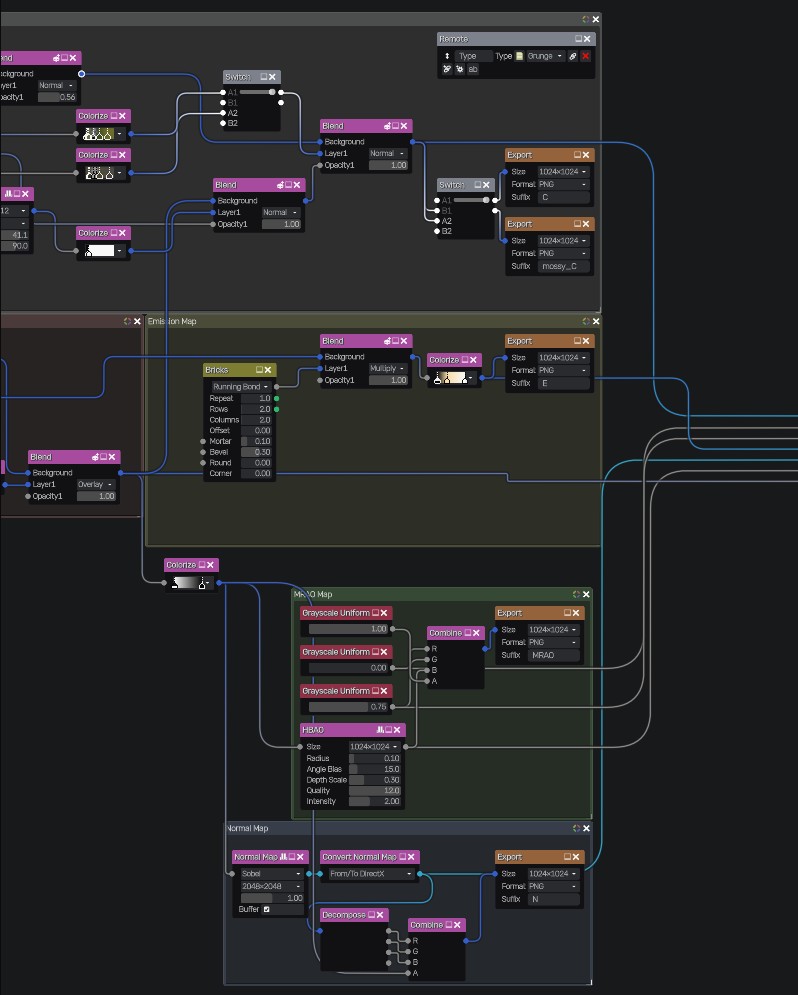
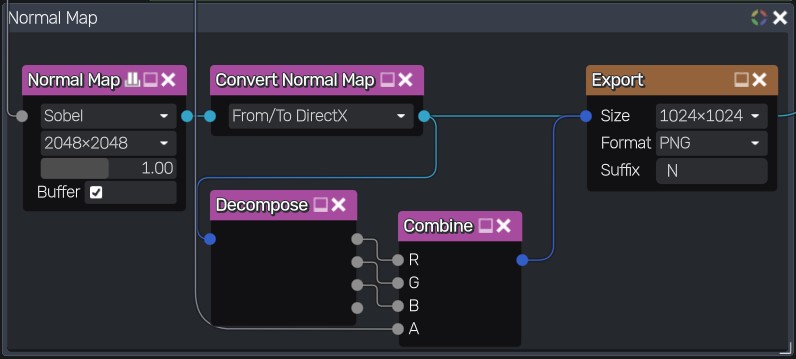
Material Maker’s PBR workflow is already metal/rough, so you don’t need to do anything extra on that department. In order to pack the MRAO and Normal + Height maps, you will have to use the Decompose and Combine nodes to split and merge a texture’s channels, respectively. See the image above for how it’s done for the Normal + Height maps, there’s no native node to only set an alpha channel, but there is a community node that can do it.
Make sure you convert the incoming normal map to DirectX with a Convert Normal Map node with From/To DirectX set. Otherwise, you will get a two-channel normal map with an inverted green channel!
Material Maker uses a Depth map input for the parallax occlusion effect instead of a Height map! Consider this when exporting.
Since there’s no “to Source Engine quick export” support, you’ll have to add the Export nodes on the final outputs of your node setup, then use the File > Export Material > Quick Export function.
On the current version (1.6), there’s a bug with the UV mapping of the cube model, be sure to change it if you plan to use the preview viewport!
Texture Creation - Painter #
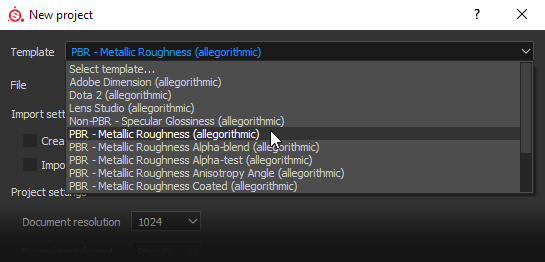
When starting a new project in Painter, you should be fine using the standard PBR - Metal Roughness template.
However, the PBR shader uses MRAO textures, so a custom export template is needed otherwise the channels must be packed together into a single texture elsewhere.
You can try this export template, which creates the MRAO texture as well as an Emissive texture if one exists:
This template does not include the height map in the normal map alpha for parallax.
It can go in the Allegorithmic\Substance Painter\shelf\export-presets folder.
Texture Creation - Designer #
Creating the input textures isn’t covered in the guide - this section simply shows how to composite both the MRAO and normal map with the height textures correctly.
You can create a MRAO texture by putting the Metalness, Roughness, Ambient Occlusion, and a White Uniform Color Node into an RGBA Merge Node.
The normal map with height embedded is simpler and can be achieved with an Alpha Merge node.
Both processes are shown below. The MRAO is colour-coded to make it easier to follow:
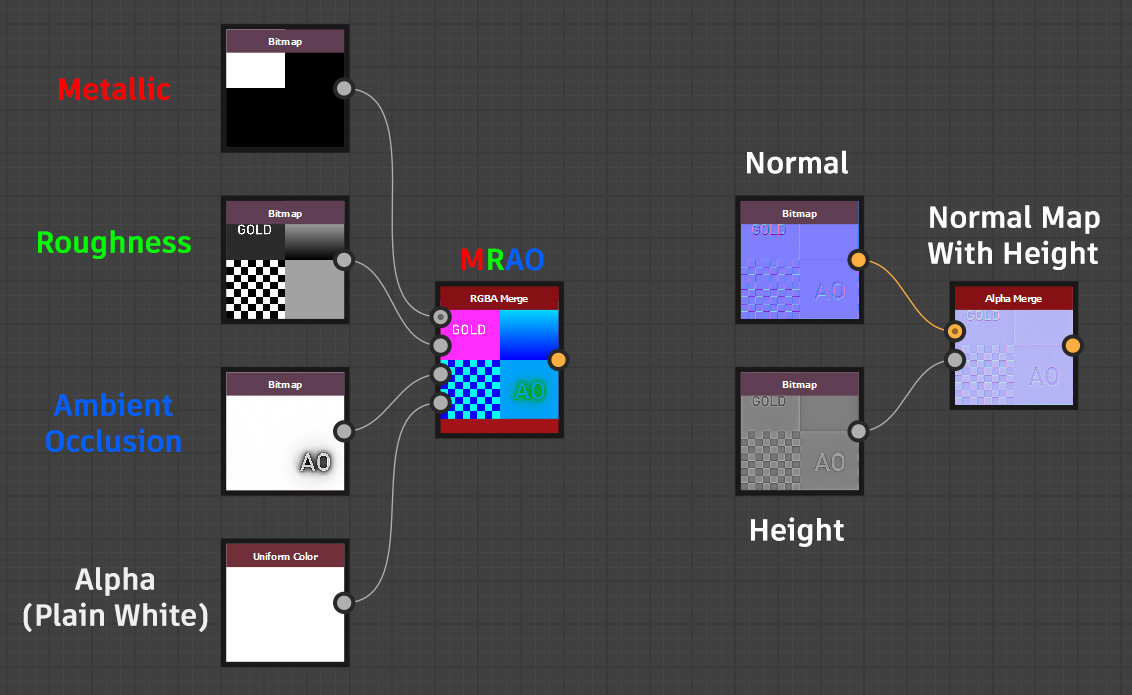
You should then have the 3 minimum textures needed for the shader.
Manual MRAO Creation in an image manipulation program (Channel Packing) #
If you have several textures you want to create an MRAO from and you don’t have any material authoring suite, you can create it manually in something like Photoshop or GIMP.
The process is simple; you just need all 3 grayscale textures required to make an MRAO.
Photoshop: #
This is one method to merge multiple grayscale images into one color image in Photoshop, and this was written quite some time ago, so the precise or more efficient steps might be different.
The only layers you need are those of the 3 textures; add them all, check their properties, and look for these checkboxes:
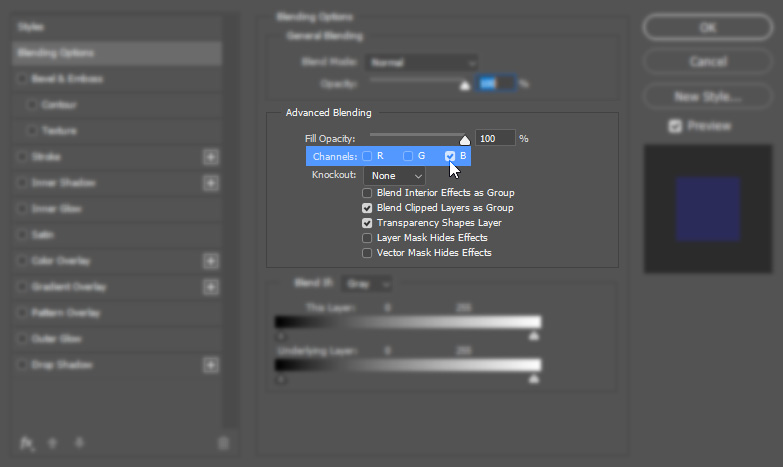
By default, all 3 of these are checked, which is normal. Depending on which texture layer you’ve selected, change the checkboxes to the following:
Metallic:
- R Checked
- G Unchecked
- B Unchecked
Roughness:
- R Unchecked
- G Checked
- B Unchecked
Ambient Occlusion:
- R Unchecked
- G Unchecked
- B Checked
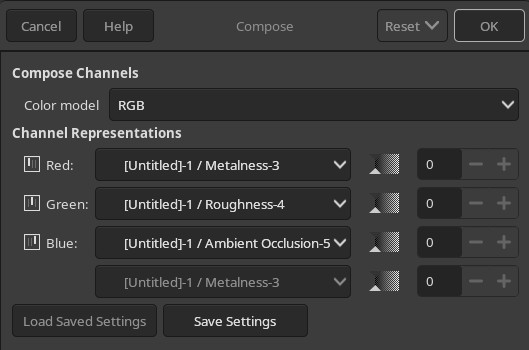
GIMP: #
-
If you see the “Create a New Image” dialog, expand the “Advanced Options” dropdown and change Color space: to Grayscale. If you opened the image in GIMP directly, go to
Image > Mode > Grayscale, instead. -
Add all grayscale images as layers.
-
Go to
Colors > Components > Compose... -
A window will open (see below), from here assign your Metalness map to the Red channel, Roughness to the Green channel and Ambient Occlusion to the Blue Channel.
Whatever program you chose, you should have a strange, but colourful looking image that you can save and make use of with the PBR shader.